How to Turn Blog Posts Into Pinterest Pins (Complete Guide)
If you publish blog posts and want more traffic, Pinterest is one of the highest-converting channels - but only if you create pins consistently. The problem? Turning each post into multiple pins by hand is slow and tedious. In this guide, you'll learn exactly how to turn blog posts into Pinterest pins using an AI pin generator, so you can go from published article to scheduled pins in minutes instead of hours. For niche-specific angles, start from Pinterest marketing strategies by niche; for volume targets read how many Pinterest pins per blog post and blog to Pinterest pins automatically.
Why You Need Pins for Every Blog Post
Pinterest drives long-term traffic. A single pin can bring visitors months or years after you publish it. But Pinterest's algorithm favors fresh, varied content. That means one pin per post isn't enough - you need multiple pins per post, with different images, headlines, and angles. Manually designing 5-10 pins per post in Canva or similar tools can take 30-60 minutes per article. If you publish weekly, that's hours every month spent on pin design alone.
The solution is to automate the heavy lifting: let AI generate pin images and copy from your blog URL, then you tweak and schedule. Tools like URL2Pin turn a blog URL into multiple Pinterest-ready pins in under a minute. Here's how it works step by step.
Step 1: Open the URL2Pin App and Paste Your Blog URL
Go to url2pin.com and open the app. You'll see a clean interface with an "Article URL" field. Paste the full URL of your published blog post - for example, https://yoursite.com/your-post. Click "Fetch" and the tool will pull the article title, meta description, and domain. No need to copy-paste anything manually.
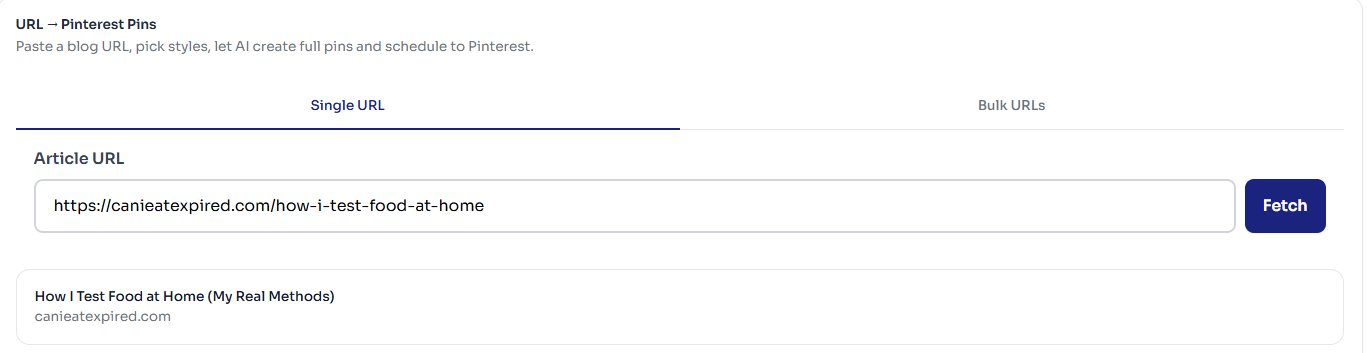
If you have multiple posts to promote, switch to "Bulk URLs" and paste up to 5 URLs, one per line. This is ideal when you want to batch-create pins for several articles at once. For a deeper dive on bulk workflows, see our guide on creating 50 Pinterest pins from 5 blog posts.
Step 2: Choose Pin Styles
Next, select one or more pin styles. Each style produces a different layout and aesthetic - minimal, recipe-style, infographic, collage, and more. Picking 2-4 styles per post gives you variety without overwhelming your queue. The tool shows thumbnails and descriptions so you can choose styles that fit your niche.
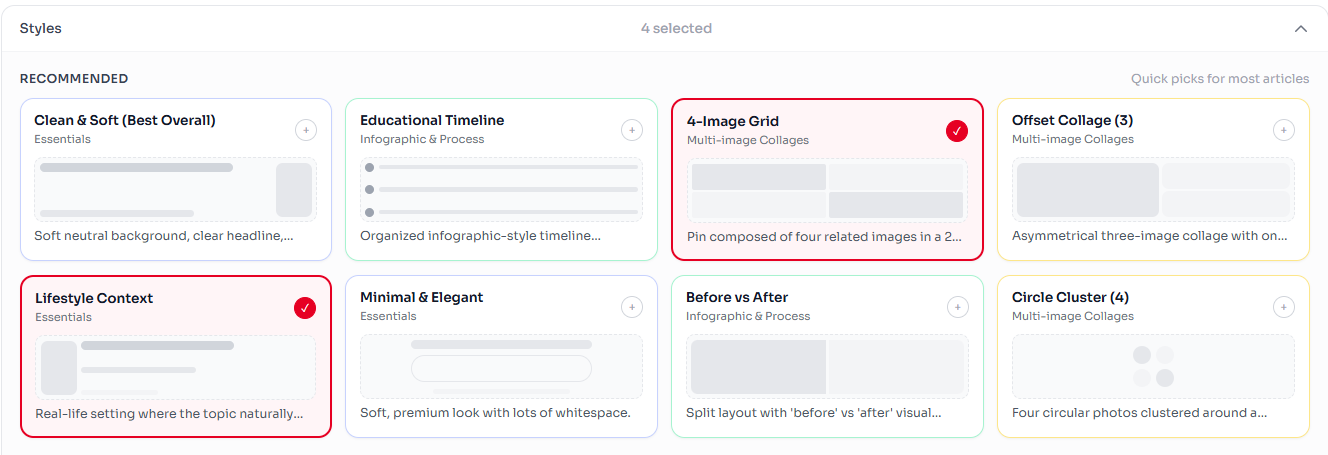
For food and recipe blogs, styles like "Clean Appetizing" or "Cozy Baking" work well. For how-to and tutorial content, "Timeline Infographic" or "Before vs After" are strong choices. You can mix and match - each style generates multiple pin variations, so 3 styles might yield 10+ unique pins from a single URL.
Step 3: Generate Pins with AI
Click "Generate" and the AI creates pin images, titles, descriptions, and hashtags. URL2Pin uses Nano Banana 2 for image generation, which produces photorealistic, on-topic visuals. You'll see a progress bar as each style completes. Most pins are ready in under 60 seconds per style.
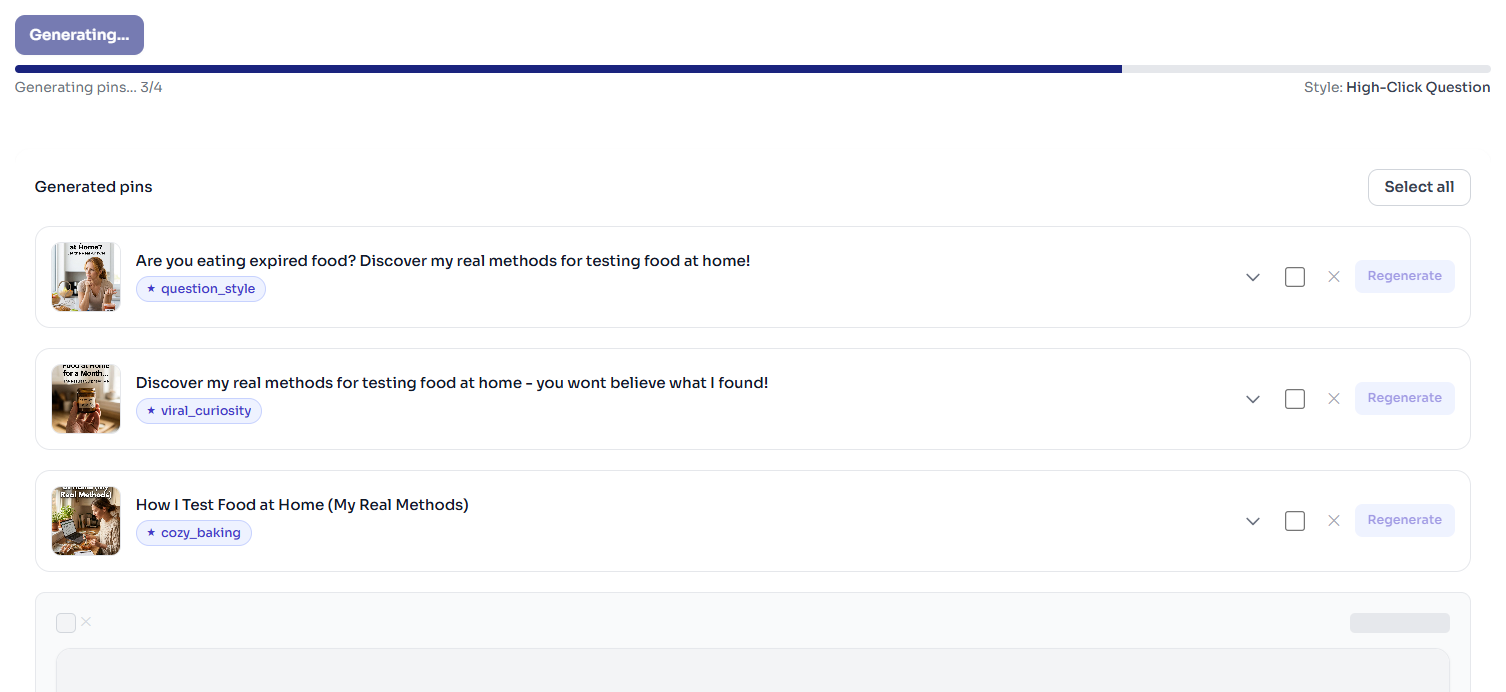
The generated pins appear in a list with thumbnails, titles, and style tags. You can select which ones to keep, regenerate individual pins if you don't like an image, or edit any text before exporting or scheduling.
Step 4: Edit Titles, Descriptions, and Links
Before scheduling, review and tweak the AI-generated copy. Expand any pin to see the full editor: you can change the website link, pin title (up to 100 characters), and description (up to 450 characters). The AI Title and AI Desc buttons still use AI to rewrite those Pinterest fields, but they do not create a new pin image, only the listing text changes.
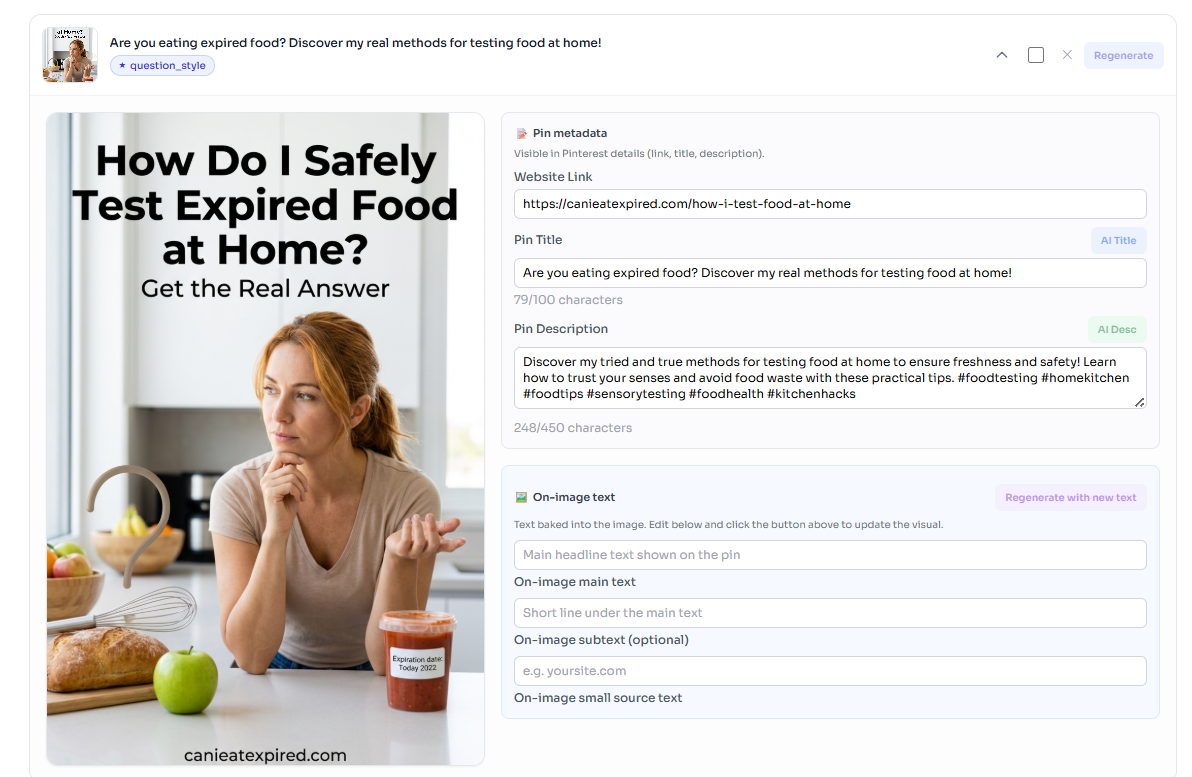
Headlines and subheads that appear on the pin graphic are generated by the same image pipeline as the picture (e.g. Nano Banana 2). Edit them and click Regenerate with new text to run the image model again, it is not a non-AI text-only overlay. That lets you A/B test hooks while keeping professional pin art.
Step 5: Download or Schedule to Pinterest
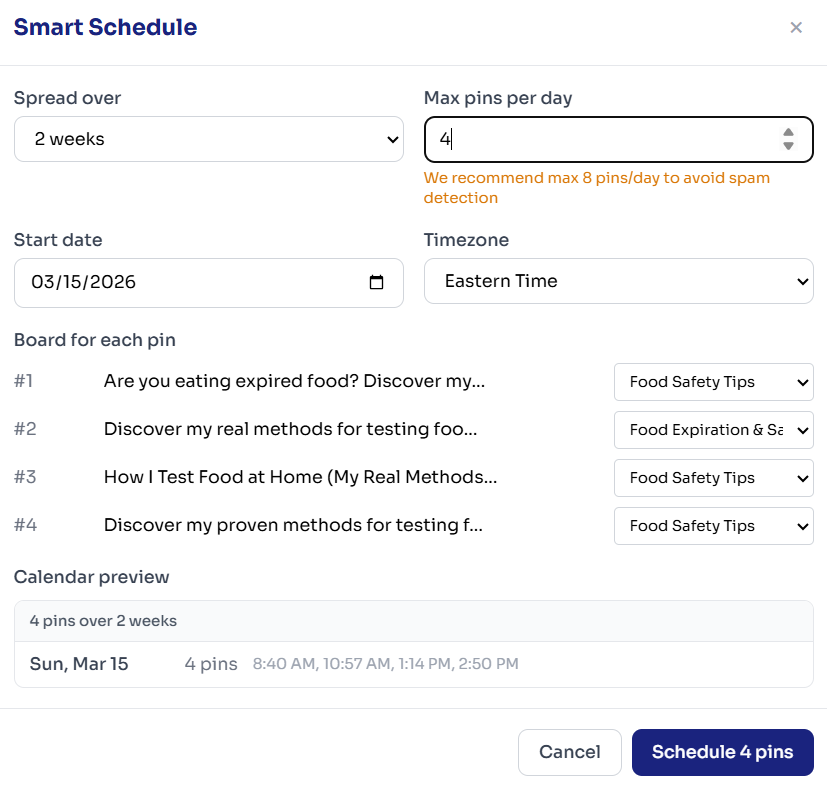
Once you're happy with the pins, you can download them as a ZIP or schedule them directly to your Pinterest boards. For scheduling, connect your Pinterest account (one-time OAuth), pick a board for each pin, and use Smart Schedule to spread pins over days or weeks with custom times and ±20 minute randomness so posting looks natural.
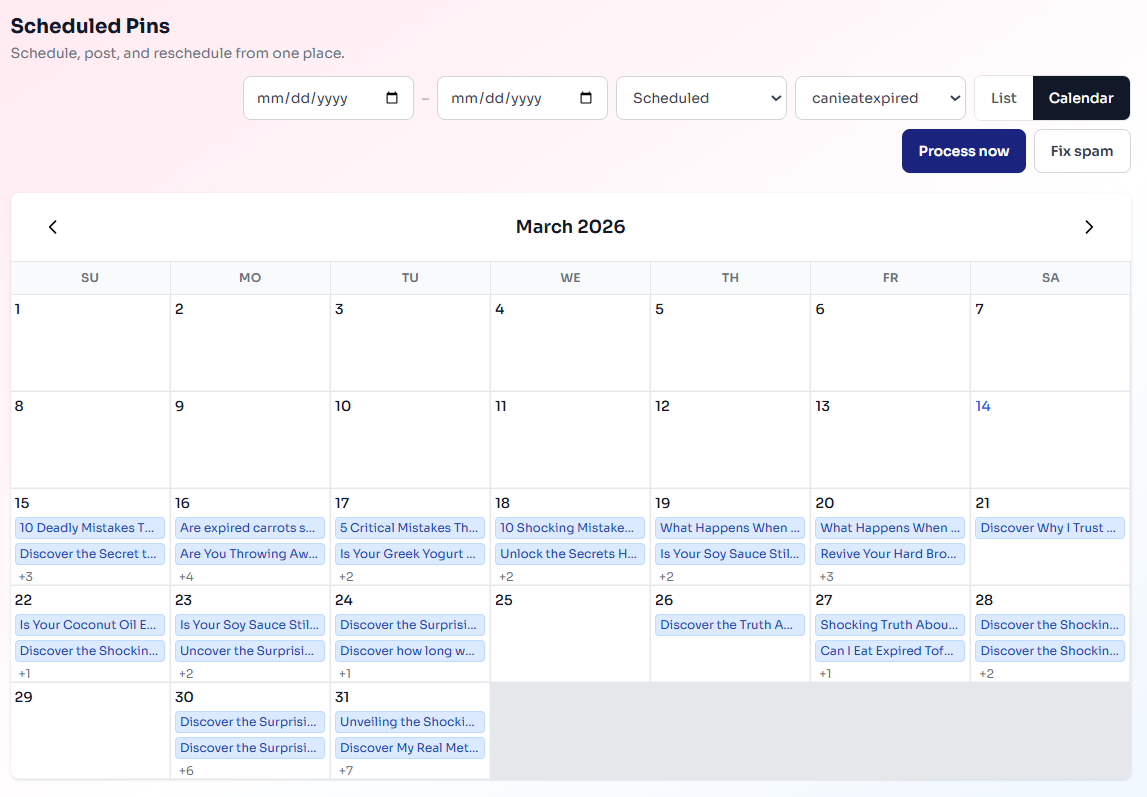
The Scheduled Pins dashboard shows a calendar view so you can see when each pin will go live. You can filter by account, date range, and status, and reschedule or process pins manually if needed.
Best Practices for Turning Blog Posts Into Pins
- Create 5–10 pins per post. Different images and headlines help you test what resonates and extend the lifespan of each article.
- Use URLs from published posts. The tool fetches metadata from the live URL, so make sure the post is live before generating pins.
- Edit before scheduling. AI copy is a great starting point, but your voice and keywords will perform better - tweak titles and descriptions to match your brand. For a full breakdown of pin titles, descriptions, and keywords, read our Pinterest SEO guide.
- Spread pins over time. Don't post 10 pins in one day. Use Smart Schedule to space them out over 1–4 weeks so your feed looks consistent, not spammy.
- Match styles to your niche. Food blogs benefit from appetizing, recipe-style layouts; how-to content works well with infographic and step-card styles.
How This Compares to Manual Pin Creation
The old workflow: open Canva, copy the blog title, find a stock image, design a pin, repeat. For 10 pins per post, that's easily 30-60 minutes. With URL2Pin, you paste the URL, pick styles, and get 10 pins in under 60 seconds. The time savings add up fast - if you publish 4 posts per month and create 8 pins per post, you're looking at 32 pins. Manual: ~4 hours. With URL2Pin: ~10 minutes of setup plus light editing.
For a comparison of URL2Pin to other AI Pinterest tools, see our roundup of the best free AI Pinterest tools in 2026. URL2Pin stands out for its free tier, bulk URL support, and Nano Banana 2 image quality. If you're starting from zero followers, our guide on getting free Pinterest traffic without followers walks you through the strategy.
FAQ
- Do I need to sign up to try URL2Pin?
You can paste a URL and explore the interface without signing up. You'll need an account to generate pins and schedule to Pinterest.
- What if my blog post isn't live yet?
The tool fetches metadata from the live URL. Publish your post first, then generate pins so the title and description are accurate.
- Can I use this for affiliate or product posts?
Yes. Paste the URL of any article or product page. The AI will generate pins based on the page content. Just make sure to set the correct link in the pin metadata so clicks go to the right destination.
- How many pins should I create per blog post?
Aim for 5–10 pins per post. Use different styles and headlines to test what gets saves and clicks. Over time, you'll learn which angles perform best for your audience.
Ready to turn your blog posts into Pinterest pins?
Open the URL2Pin app →Monetizing with Amazon Associates on Pinterest?
The workflow is the same—multiple pins per URL, keyword-clear titles—but your destination is usually a review or roundup with disclosure, not a bare product link. Start with our Amazon affiliate Pinterest guide, then turn product URLs into pins with URL2Pin.
All Amazon affiliate articles → · Niche hub → · Amazon affiliates FAQ → · Pinterest SEO for affiliates →
Ready to try it?